
Latex And Satin
 This Tutorial was Written by Me in it's Entirety on January 10, 2009 ~ Any Similarity to any other Tutorial is Purely Coincidental
Supplies Needed:
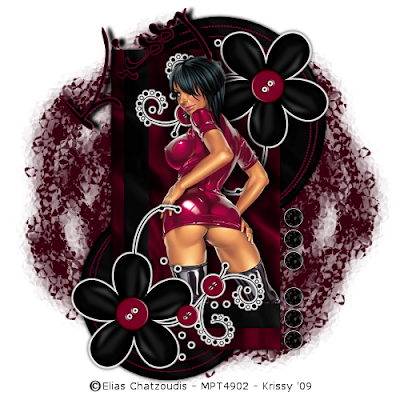
Tube of Choice ~ I am using the Wicked Artwork of Elias Chatzoudis
You can Purchase a License to use his Artwork HERE
Font of Choice ~ I am using a Free Font Called Al Sandra ~ Included in Additional Supplies
Scrap Kit of Choice ~ I am using a Stunning new Freebie Kit by Scrapz A Daisy ~ *Satin* ~ You can find this Kit by Visiting Paula HERE
Outside Filter Used: Alien Skin Eye Candy 4000 ~ Gradient Glow ~ Optional
*Please Note: All Scrap Items for this Tutorial were Created by Paula and are NOT to be Shared or Uploaded Elsewhere ~ They can be downloaded for FREE from her BLOG
Thanks again to Chelle aka Weescotslass for Use of her Fabo Mask. You can find Weescotslass and her Masks HERE
Also Thanks to Missy for Use of her Great Tag Template #89. You can find Missy and her Tag Templates HERE
~~~~~~~~~~~~~~~~~~~~~~~~~~~~~~~~~~~~~~~~~~
Time to get Creative!
Open your Tag Template ~ missy_tagtemplate89 ~ Duplicate this then Close the Original
Image ~ Canvas Size ~ 500 x 500
Flood Fill Background ~ White ~ New Layer ~ Flood Fill #37010f
Open Mask WSL_Mask107 ~ Layers ~ New Mask Layer from Image ~ In the Drop Down Window locate WSL_Mask107 ~ Source Luminance Checked ~ Click OK ~ Merge Group
Click on your "Small Circle" Layer ~ Selections ~ Select All ~ Float ~ Defloat
Locate and Open SAD_Satin_Paper 2 ~ Image ~ Resize 10% ~ Paste as a New Layer ~ Selections ~ Invert ~ Hit Delete ~ Apply a Slight Drop Shadow of Choice
Repeat the above Steps for the Following Layers: "Larger Circle" ~ "Thin Rectangle 1" and "Thin Rectangle 2"
Click on your "Rectangle" Layer ~ Selections ~ Select All ~ Float ~ Defloat
Locate and Open SAD_Satin_Paper 1 ~ Image ~ Resize 10% ~ Paste as a New Layer ~ Selections ~ Invert ~ Hit Delete ~ Again apply a Slight Drop Shadow of Choice
Now you can Delete all of the Original "Named" Layers in your Layers Palette
Select your Ellipse Tool ~ Line Style: Dot ~ Width 2.00 ~ Background Colour Null ~ Foreground Colour #600626 ~ Draw out 4 Circles and Position using My Tag for reference
Open your Tube of Choice ~ Copy ~ Paste ~ Drop Shadow ~ Position
Locate and Open Cluster Flowers 2 ~ Erase any Extra that you do not Wish to have in your Tag and Position ~ Duplicate ~ Mirror ~ Effects ~ Plugins ~ Eye Candy 4000 ~ Gradient Glow to both Clusters
Glow Width - 3
Soft Corner - 0
Overall Opacity - 100
Colour - White
Open Gem 2 ~ Resize 3% ~ Position and Duplicate as Desired ~ Slight Drop Shadow
Onto our Text!
Activate your Text Tool ~ Open your Al Sandra Font ~ Background Colour Black ~ Foreground Colour #600626 with a Stroke Width of 1.5 ~ Add your Text and position as Desired
Effects ~ 3D Effects ~ Inner Bevel of Choice
Apply your Final Drop Shadow
V - 0
H - 8
Opacity - 100
Blur 6.00
Add any Required Copyrights to your Tag ~ Merger Visible ~ Save as a .jpeg and you are Finished!
I hope you had Fun with my Tutorial!
Huggerz ~ Krissy :)
© Elias Chatzoudis ~ Krissy '09


0 comments:
Post a Comment