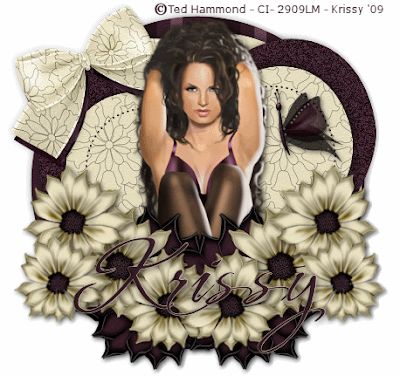
Temptation
 You can View the Animated Tag HERE
This Tutorial was Written by Me in it's Entirety on January 08, 2009 ~ Any Similarity to any other Tutorial is Purely Coincidental
Supplies Needed:
Tube of Choice ~ I am using the Stunning Artwork of Ted Hammond
You can Purchase a License to use his Artwork HERE
Font of Choice ~ I am using a Paid Font called "Hurricane"
Scrap Kit of Choice ~ I am using a Gorgeous PTU Scrap Kit from Scrapz A Daisy *Emily*
You can Purchase this Kit HERE
Animation Shop ~ Optional
Special Thanks to Missy for Use of her Awesome Tag Template #40. You can find Missy and her Tag Templates HERE
~~~~~~~~~~~~~~~~~~~~~~~~~~~~~~~~~~~~~~~~~~
Onto the Tutorial!!
Open your Tag Template ~ missy_tagtemplate40 ~ Duplicate this then Close the Original
Click on your "Larger Circle" Layer ~ Selections ~ Select All ~ Float ~ Defloat
Locate and Open Paper 16 ~ Image ~ Resize 50% ~ Paste as a New Layer ~ Selections ~ Invert ~ Hit Delete ~ Apply your Drop Shadow of Choice
Selections ~ Select All ~ Open KSSDPaper 5 ~ Copy ~ Paste into Selection ~ Select None ~ Repeat this step for the Layers Named: "Small Circle" ~ "Larger Heart" & "Smaller Heart" ~ I used Papers 1, 8 & 5 ~ Remember to Resize the Papers & Apply your Drop Shadows :)
Before we move on we will create our Animation Layers
Duplicate your "Larger Heart" Layer Twice ~ You will now have Three Larger Heart Layers in your Layer Palette
Close off (X Out) the Bottom Two Large Heart Layers ~ With the Top one still Selected ~ Adjust ~ Add/Remove Noise ~ Add Noise ~ Uniform and Monochrome Selected ~ Noise 16%
Repeat this step for the remaining Larger Heart Layers ~ Be sure to keep Uniform and
Monochrome Selected ~ Alter your Noise to 20% and 24% Accordingly
Click on your "Dotted Line Heart" Layer ~ Selections ~ Select All ~ Float ~ Defloat ~ Create a New Layer ~ Take you Flood Fill Tool and Flood with #381e28 ~ Selections ~ Select None
Open your Tube of Choice ~ Copy ~ Paste ~ Resize 80% ~ Drop Shadow ~ Position
Open Flower 12 ~ Copy ~ Paste ~ Resize 68% Position using My Tag for Reference ~ Duplicate ~ Mirror ~ Merge Down ~ Drop Shadow of Choice
Open Flower 9 ~ Copy ~ Paste ~ Resize as Desired ~ Duplicate and Mirror this Layer to Decorate the Bottom of your Tag ~ Drop Shadows if Desired
Open Bow 8 ~ Copy ~ Paste ~ Mirror ~ Resize 68% ~ Position using My Tag for Reference ~ Drop Shadow
Locate and Open Bow 5 ~ Copy ~ Paste ~ Mirror ~ Resize 68% ~ Again Position using My Tag for Reference ~ Drop Shadow
Open Butterfly 6 ~ Copy ~ Paste ~ Mirror ~ Resize 28% ~ Yup ~ Position using My Tag for Reference ~ LoL ~ Drop Shadow
Now to our Text!
Apply your Text and position as Desired ~ I used Hurricane ~ Background Colour #381e28 ~ Foreground Colour #e3d9ba with a Stroke Width of 0.5
Effects ~ 3D Effects ~ Inner Bevel of Choice
Apply a Drop Shadow to your Text if Desired ~ Add any Required Copyrights to your Tag
You can now choose to Stop here or Keep Going to add Your Animation!
~~~~~~~~~~~~~~~~~~~~~~~~~~~~~~~~~~~~~~~~~~
Here I will assume you have a General Working Knowledge of both Paint Shop Pro and Animation Shop
Making sure you still have your lower two Larger Heart Layers closed off ~ Export your Tag as a .jpeg ~ Close off the Top Larger Heart Layer and Open the one Below ~ Export again as a .jpeg ~ Close the Middle Larger Heart Layer and Open the Bottom one ~ Export your Tag for the Last Time
This is the way I have found best for Myself Personally but do please Remember each Individual has their own way of doing things ~ This is Simply a Guide :)
Head to Animation Shop ~ Animation Wizard ~ Click Next through the Settings until you get to your Animation Looping and Speed ~ Make sure you check "Yes, Repeat the Animation Indefinitely" and set your Speed to 10
Locate and Add the three Images you Exported from Paint Shop Pro and Click through to Finish ~ File ~ Optimization Wizard and Again Click through to Finish ~ File ~ Save
Voila! Your Tag is Complete ~ Giggles
Hugz ~ Krissy :)
© Ted Hammond ~ Krissy '09


0 comments:
Post a Comment