Forget You Not
 You can View the Animated Tag HERE
This Tutorial was Written by Me in it's Entirety on June 18, 2010 and is Dedicated to My Very Special Grandfather ~ A.S.Birch ~ I Love & Miss You Gramps xxx ~ Any Similarity to any other Tutorial is Purely Coincidental
Supplies Needed:
Tube of Choice ~ I am using the Stunning Artwork of Jennifer Janesko
You can Purchase a License to use her Artwork HERE
Font of Choice ~ I am using one of Favourite Free Fonts Called "Lainie Day SH"
Scrap Kit of Choice ~ I am using a Beautiful PTU Scrap Kit from Mystic Creations ~ *Memories Of Dad*
You can Purchase this Kit HERE
Mura's Meister ~ Copies
Xenofex 1.1 ~ Optional
Animation Shop ~ Optional
Mask of Choice ~ I am using another Great Mask by Chelle aka Weescotslass. You can find Weescotslass HERE
~~~~~~~~~~~~~~~~~~~~~~~~~~~~~~~~~~~~~~~~~~
On To the Tutorial!!!
File ~ New Image ~ 440 x 440 ~ Flood Fill your Layer with White
New Layer ~ Flood Fill with Colour #90aec6
Open Mask WSL_Mask179 ~ Layers ~ New Mask Layer from Image ~ In the Drop Down Window locate WSL_Mask179 ~ Source Luminance Checked ~ Click OK ~ Merge Group
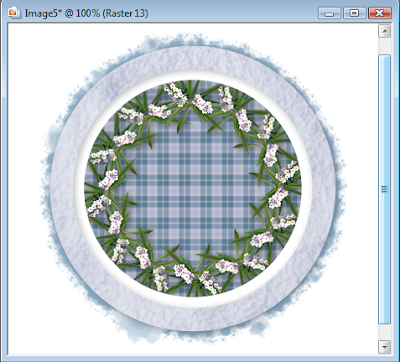
Locate and Open MCMODPaper 02 ~ Select your Ellipse Tool ~ Line Style: Plain ~ Background Pattern Set to MCMODPaper 02 - Scale 48 ~ Foreground Colour Null ~ Draw out a Circle slightly Smaller than your Mask
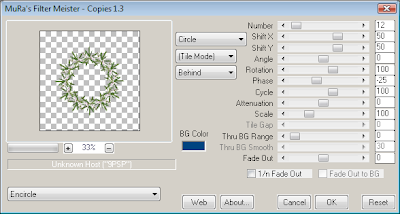
Open MCMODForget-me-not 02 ~ Resize 20% ~ Sharpen if Required ~ Mura's Meister - Copies Using the Settings Below
 Locate and Open MCMODPaper 10 ~ Select your Ellipse Tool Again ~ Line Style: Plain ~ Width 28.00 ~ Foreground Pattern Set MCMODPaper 10 - Scale 48 ~ Background Colour Null ~ Draw out another Circle slightly Smaller than your Masks Shape using My Tag for Reference ~ Convert to Raster Layer ~ Apply Drop Shadow
V - 2
H - 2
Opacity - 40
Blur 12.00
Open your Tube of Choice ~ Copy ~ Paste ~ Resize 88% ~ Drop Shadow
V - 1
H - 1
Opacity - 20
Blur 6.00
Locate and Open MCMODHeart Button 02 ~ Copy ~ Paste ~ Resize 18% ~ Position using My Tag for Reference ~ Apply your Drop Shadow of Choice
Open MCMODHeart Button 01 ~ Copy ~ Paste ~ Resize 16% ~ Position Again using My Tag for Reference ~ Apply your Drop Shadow
Now for our Text!
Apply your Text and position as Desired ~ I used Lainie Day SH ~ Background Colour #004480 ~ Foreground Colour #ffffff with a Stroke Width of 1.0
You can now choose to Stop here or Keep Going to add Your Animation!
Add any Required Copyrights to your Tag and Apply a Drop Shadow to your Text if Desired
~~~~~~~~~~~~~~~~~~~~~~~~~~~~~~~~~~~~~~~~~~
Here I will assume you have a General Working Knowledge of both Paint Shop Pro and Animation Shop
Now to create our Animation Layers
Select your Ellipse Tool ~ Line Style: Plain ~ Width 28.00 ~ Foreground Colour #ffffff ~ Background Colour Null ~ Draw out a Circle and Position using the Image below as a Reference :)
 Duplicate your "White" Circle Layer Twice ~ You will now have Three Circle Layers in your Layer Palette
Close off (X Out) the Bottom Two Circle Layers ~ With the Top one still Selected ~ Effects ~ Plugins ~ Xenofex 1.1 ~ Constellation
Star Size - 15
Sharpness - 54
Overdrive - 48
Random Seed - 50
Settings - Starfield
Repeat this step for the remaining Circle Layers ~ Altering your Random Seed to 60 and 70 Accordingly for each Layer
Open Animation Shop Now
Making sure you still have your lower two Circle Layers closed off ~ Copy Merged ~ Paste as a new Animation ~ Close off the Top Circle Layer and Open the one Below ~ Copy Merged again ~ Paste After Current Frame ~ Close the Middle Circle Layer and Open the Bottom one ~ Copy Merged for Last Time ~ Paste After Current Frame
File ~ Optimization Wizard and Click through to Finish ~ File ~ Save
Your Tag is Done ~ Yay!
Huggers ~ Krissy
© Jennifer Janesko ~ Krissy '10


0 comments:
Post a Comment