
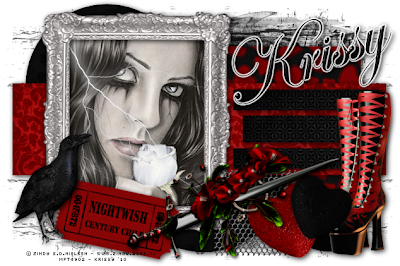
Waiting
 You can View the Animated Tag HERE
This Tutorial was Written by Me in it's Entirety on June 25, 2010 ~ Any Similarity to any other Tutorial is Purely Coincidental
Supplies Needed:
Tube of Choice ~ I am using the Amazing Artwork of Zindy Nielsen
You can Purchase a License to use her Artwork HERE
Font of Choice ~ I am using a Pay Font Called "Edwardian Script ITC"
Scrap Kit of Choice ~ I am using a Fabulous PTU Scrap Kit from Felice Original ~ *Our Love Will Never Die*
You can Purchase this Kit HERE
Eye Candy 4000 ~ Glass & Gradient Glow ~ Optional
Alien Skin Xenofex 2 ~ Optional
Animation Shop ~ Optional
Mask of Choice ~ I am using another Great Mask by Chelle aka Weescotslass. You can find Weescotslass HERE
Twilight Tag Template 3 by Yvette. You can find Yvette and her Great Tag Templates HERE
~~~~~~~~~~~~~~~~~~~~~~~~~~~~~~~~~~~~~~~~~~
On To the Tutorial!!!
Open your Tag Template ~ Yvette_EOC_Twilight Template3 ~ Close off (X Out) all of the Original "Named" Layers & the Copyright Layer in your Layers Palette
New Layer ~ Flood Fill with Colour #0c0c0c
Open Mask WSL_Mask221 ~ Layers ~ New Mask Layer from Image ~ In the Drop Down Window locate WSL_Mask221 ~ Source Luminance Checked ~ Click OK ~ Merge Group
Click on your "Large Rectangle" Layer ~ Selections ~ Select All ~ Float ~ New Layer
Locate and Open FOBlackHearts ~ Flood Fill your newly Selected layer with the Paper Pattern ~ Scale 54 ~ Selections ~ Select None ~ Apply a Drop Shadow using the Settings Below
V - 2
H - 2
Opacity - 80
Blur 12.00
Click on your "Circle 2" Layer ~ Selections ~ Select All ~ Float ~ New Layer
Locate and Open FOBlackBrocaat ~ Flood Fill your newly Selected layer with the Paper Pattern ~ Scale 48 ~ Selections ~ Select None ~ Drop Shadow as Above
Click on your "Circle 1" Layer ~ Selections ~ Select All ~ Float ~ New Layer
Again Flood Fill your newly Selected layer with the FOBlackBrocaat Pattern ~ Scale 48 ~ Selections ~ Select None ~ Apply your Drop Shadow
Click on your "Rectangle 1" Layer ~ Selections ~ Select All ~ Float ~ New Layer
Locate and Open FOVintageDamaskRed ~ Flood Fill your newly Selected layer with the Paper Pattern ~ Scale 48 ~ Selections ~ Select None ~ Yep ~ Drop Shadow Again ~ LoL
Click on your "Slats" Layer ~ Selections ~ Select All ~ Float ~ New Layer
Open FOBlackTexture ~ Flood Fill your newly Selected layer with the Paper Pattern ~ Scale 48 ~ Selections ~ Select None ~ Drop Shadow
Click on your Pale Grey "Background" Layer ~ Selections ~ Select All ~ Float ~ New Layer
Again Flood Fill your newly Selected layer with the FOBlackTexture Pattern ~ Scale 48 ~ Selections ~ Select None
Open your Tube of Choice ~ Copy ~ Paste as a New Layer ~ Resize 80% ~ Sharpen if Required ~ Position using My Tag for Reference
Locate and Open FOFrameSilver ~ Copy ~ Paste as a New Layer ~ Resize 60% ~ Select your "Pick Tool" and Drag your Frame to Surround your Tube
Locate and Open FOLittleChickenwire ~ Copy ~ Paste as a New Layer ~ Resize 16% ~ Position using My Tag for Reference Again
Open FOConcertTicket ~ Copy ~ Paste as a New Layer ~ Resize 20% ~ Image ~ Free Rotate ~ Right 12 ~ Position and Apply your Drop Shadow
V - 2
H - 2
Opacity - 80
Blur 12.00
Locate and Open FOBoots ~ Copy ~ Paste ~ Resize 28% ~ Position ~ Adjust ~ Sharpness ~ Unsharp Mask with the Following Settings
Radius - 2.00
Strength - 28
Clipping 4
Apply your Drop Shadow :)
Locate and Open FOGlitteredHeartRed ~ Copy ~ Paste ~ Image ~ Mirror ~ Resize 20% ~ Adjust ~ Brightness and Contrast ~ Brightness 0 ~ Contrast 12 ~ Position again as Desired ~ Apply your Drop Shadow
Open FOGlitteredHeartBlack ~ Copy ~ Paste ~ Resize 16% ~ Position and Apply your Drop Shadow
Open FOSword ~ Copy ~ Paste ~ Image ~ Mirror ~ Resize 20% ~ Adjust ~ Brightness and Contrast ~ Brightness 16 ~ Contrast 12 ~ Position using My Tag for Reference ~ Drop Shadow Again :)
Locate and Open FOCrow ~ Copy ~ Paste ~ Resize 18% ~ Position as Desired ~ Drop Shadow ~ Phew ~ LoL
Now onto our Text ~ Yay!
Apply your Text and Position as Desired ~ I used Edwardian Script ITC ~ Background Colour #0c0c0c ~ Foreground Colour Null ~ Convert to Raster Layer ~ Eye Candy 4000 - Glass Using my Settings Below
 Next Apply Eye Candy 4000 - Gradient Glow ~ Colour White ~ Follow my Settings Below
 Apply your Drop Shadow once More
V - 2
H - 2
Opacity - 80
Blur 12.00
You can now choose to Stop here or Keep Going to add Your Animation!
Add any Required Copyrights to your Tag and Apply a Drop Shadow to your Text if Desired
~~~~~~~~~~~~~~~~~~~~~~~~~~~~~~~~~~~~~~~~~~
Here I will assume you have a General Working Knowledge of both Paint Shop Pro and Animation Shop
Now to create our Animation Layers
Duplicate your Tube Layer Twice ~ You will now have Three Tube Layers in your Layer Palette
Close off (X Out) the Bottom Two "Tube" Layers ~ With the Top one still Selected ~ Effects ~ Plugins ~ Alien Skin Xenofex 2 ~ Lightning ~ Follow my Settings Below
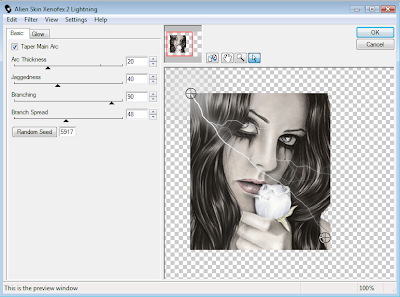
 Repeat this step for the remaining Tube Layers ~ Altering your Random Seed for each Layer
Open Animation Shop Now
Making sure you still have your lower two Tube Layers closed off ~ Copy Merged ~ Paste as a new Animation ~ Close off the Top Tube Layer and Open the one Below ~ Copy Merged again ~ Paste After Current Frame ~ Close the Middle Tube Layer and Open the Bottom one ~ Copy Merged for Last Time ~ Paste After Current Frame
File ~ Optimization Wizard and Click through to Finish ~ File ~ Save
All Done ~ I Hope you have Enjoyed this Tutorial
Huggers ~ Krissy
© Zindy Nielsen ~ Krissy '10


0 comments:
Post a Comment